Showing posts with label #Christmas. Show all posts

Dishing Up Christmas


Bowl Cozies


This year I dusted off sewing skills that had been dormant for decades by taking a couple sewing classes. One of the classes featured bowl cozies, which I've found so useful that I thought these would make great Christmas gifts.

‘Sew’, after a trip to a nearby fabric store for supplies, I set up the sewing machine and got to work. Selecting fabrics that reflected interests of the recipients (family members) allowed me to make the bowl cozies personalized.

After sewing was finished, I turned my projects into gift bags with the addition of a bowl, instant oatmeal, hot soups, and crackers. With some raffia to fill in spaces and some Christmas-themed gift bags, these made nice little gifts that were made with love and didn’t cost a fortune (except for mailing, sigh).


Following several YouTube videos, I discovered another super easy and cute pattern for pocket tissue holders. Using leftover fabric, I made a tissue packet holder to match each bowl cozy. After all, this is cold and flu season, so I added some vitamin C drink packets, tea, and cocoa mix.


Once Santa’s helpers at USPS had whisked away these gifts, I hunted around for more Christmas sewing projects and found these cute little mouse ornaments on Etsy from PinCutSewStudio. The ears looked daunting but the hardest part ended up being sewing around the curves. The pleated ears were a cinch.

I’m following a couple sewing crafters on YouTube for easy project ideas not only for Christmas but birthday gifts also. Browsing beautiful fabrics for projects is almost as much fun as finding stunning papers for card making.


All That Glitters!


Embossing folder, washi tape, and snowflake cut with Cricut.

It’s my favorite card-making time of year! As usual, glitter and sparkle graced each card I made. Every year some of the big card makers and card making suppliers host free classes on YouTube, Facebook, and their own web pages. 

I learned a number of techniques I had to try, bought new supplies I loved, and discovered one very useful new tool. The new tool makes it easy to adhere very delicate pieces such as greetings on a card.

Not only did I use stamps, embossing folders, and hot foil plates, but the Cricut also played a big part in drawing designs and cutting out a lot of glittery snowflakes.

So let’s take a look!


No end of sparkle here! A very simple card, but lots of visual impact. Glitter papers cut with Cricut. (Thank you, hubby, for aligning all those trees!)


 A stamped image with ink blending for the background. Lots of glitter drops for the ornaments, and a hot foiled sentiment.


The fanciest hot foil card I made this year. Breathed a sigh of relief at how well everything lined up!


This hot foil plate arrived a day late for the card to be mailed, but I love the holographic foil and how decorative the jewel embellishments look. I'll be using it a lot for next year's cards.


I loved this design cut with the Cricut and using holographic paper for the background.


The snowflake design was drawn with the Cricut and I added jewels for sparkle. The card with all foil is made with the first 3D embossing folder I bought after watching a class where it was used. Another chance to embellish with jewels!


One more card I made to announce a very special day--an historical day!

That's 44 years at the University of Washington.

I'll have so much more time to use my crafting supplies now. I'm going to need a bigger Christmas card list! 😁


Time to Make a Mess. . .I Mean Make Cards!


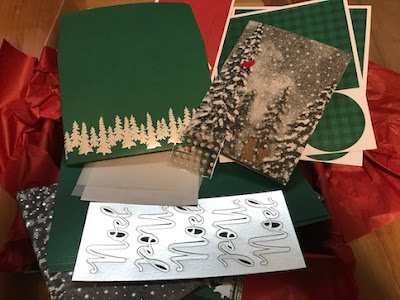
The Christmas Card Crafting Kit

It's that magical, wonderful time of year--Christmas card creation! Otherwise known as the season the craft room looks like a blizzard blew through. 

To get started this year, I ordered my first card kit from Stampin' Up. I was impressed with all that came in it. There are enough goodies to make ten cards from two different bases, including decorative envelopes.

Cue the Christmas music and let's get started!

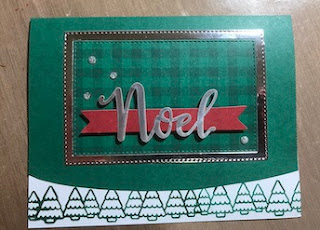
There are several videos that show what you can do with the card kit, but I went straight to an original design. Here, the silver border accents the silver Noel sentiment, and I love the curved front of the card that reveals the stamped row of trees on the inside.


In addition to the kit, there is also the Cricut library of cards. I've already made two cards using a new foiling tool I bought over the summer, and I'm very happy with the results. 


How about a pop-up card? Yes, this actually folds flat for mailing. It's another one done with the Cricut. I'm hoping the recipient is as happy with it as I am.

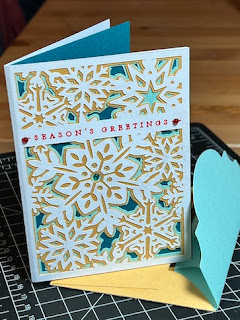
Here is another Cricut design I love. It has multiple layers of snowflake cut-outs that look like decorated cookies. Yumm!


Though I've saved so many card designs on my Pinterest board that I still want to use, I also took advantage of a two week online class featuring various techniques for making Christmas cards. Each day had two different instructors showing their card variations along with tips for using the materials.

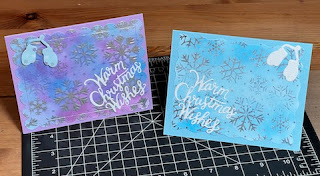
Here are two techniques I learned in the classes that use an embossing folder with foil and ink blending. 


Card making will continue for the next month and I'll share more creations next month. I have another kit on its way and I can't wait to enjoy more time in the craft room!


Recipe of the Month ~ by Grace Augustine

So, it's two days before the BIG day. Two days before you must
deposit photos
have those cookies on the plate for Santa. Two days before family and friends arrive. Two days of cleaning, decorating, and BAKING!


If you're like me, I always leave the latter for last. When I was in my 30's I looked forward to this time of year. I'd put plates of goodies together for neighbors, my mechanic, the mail people, just about anyone in my life I wanted to thank for their help and service throughout the year.

deposit photos
Over the past 40 years, I've gathered many tried and true traditional goodies. I'm sure you all have your family favorites, too. Whether it is Grandma's Gingerbread, Aunt Nellie's Snowballs, or Pete's Tom and Jerry mix, we all bring our best when it comes to Christmas treats.

One of my favorites to bake is cranberry nut bread--so convenient to put in the baby loaf pans, wrap in plastic, choose a fancy ribbon and tie a bow. The recipe is below.

deposit photos

Remember to take time for yourself, put on some holiday tunes and sing-a-long, but most of all  remember the reason for this season. From my home to yours, I wish you many blessings. See you in 2020

Merry Christmas!

Cranberry Nut Bread

2-1/2 C non-self-rising flour
1 C granulated sugar
3-1/2 tsp baking powder
1 tsp salt
1 Tbsp plus 1 tsp grated orange peel
3Tbsp cooking oil
1/2 C milk
3/4 C orange juice
1 egg
1 C finely chopped walnuts 
1 C chopped fresh cranberries

1. Heat oven to 350 degrees.
2. Grease and flour a 9 x 5 x 3 loaf pan or two 8-1/2 x 4-1/2 x 2-1/2, or 4-6 baby loaf pans.
3. Measure all ingredients into large mixer bowl.
4. Beat on medium speed for 30 seconds.
5. Pour into pans.
6. Bake for 55 to 65 min. or until inserted wooden pick in center comes out clean.
7. Cool 5 min. before removing from pans to cooling rack.
8. Cool thoroughly before serving.

VARIATIONS:
Date Nut Bread: Omit orange peel, orange juice, and cranberries. Increase milk to 1-1/4 C. and add 1 C. chopped dates.
Apricot Nut Bread: Substitute apricots for cranberries.


The Creative Urge ~ by Lexa Fisher


Photo by Brooke Lark on Unsplash
I love to cook, but making Christmas cookies and other sweet treats leaves me with a guilty conscience at this time of year. I hear so many friends complain of too much sugar during the holidays. What to do? Turn the kitchen into an apothecary!


Recipe
One of my favorite non-edible gifts to make is the shower fizzy. With just a few ingredients, they are easy to assemble. A silicone mold works best so the fizzies are easy to pop out without crumbling. Put a fizzy in the back of your shower and enjoy the scent as it melts. This time of year, the cold and sinus relief fizzy is ideal.


Goat's Milk Peppermint Soap

Another easy option is melt-and-pour soap. A glass loaf pan or even a cupcake pan make great molds if you don't want to buy specially shaped designs. Like the shower fizzy, the options with melt-and-pour soaps are endless! Check out Pinterest for wonderful ideas like this one.


Recipe


Chapsticks are easy to make in the kitchen, too! I prefer to add a bit of honey when I make them. Recipes like the one linked are easy to find on Pinterest. I've also dabbled in candles, whipped body butter, and scouring powder--all without putting a pound on my gift recipients.


All grown in my yard.


With a garden full of herbs, there are many possibilities for herbal gifts. Pictured are purple sage, sage, bay leaf, winter and summer savory, oregano, parsley, rosemary, and an herbal salt made from many of these herbs. These fresh herbs can also easily be dried in a microwave at 30 second intervals and then bottled for gifts. Herbal salt made from the same fresh herbs (lower left) gives a depth of flavor in many dishes.


And of course, I love making my own Christmas cards. Happy holidays!


La Pasta!

  This month brought more delightful neighborhood finds! I enjoyed my recent purchase of carrot cake granola from a nearby farmers’ market ,...