Apple a Day Cafe


Original art work by UDFB staff

Apple a Day cafe is the free meal program provided by the University District Food Bank in Seattle near the University of Washington. Two mornings a week I volunteer helping to prepare, and sometimes serve, freshly made meals to anyone who wants one.

Our cozy kitchen

A typical day finds five volunteers at work in a small, galley-style kitchen. I have learned a lot through my volunteer work here. Our cafe manager is well-educated in the culinary arts and has years of experience that allows her to create daily menus and help us prepare in just two hours. 

With the manager's guidance, we pay close attention to food allergies including not only the usual wheat and dairy, but also soy, tree nuts, and fish. The menu is posted on a large white board daily and each menu item notes allergens specific to that dish.

While preparing food, we also take great care to use separate cutting boards and utensils for vegetarian meals and to the noted food allergies. For instance, a cutting board used to slice bread cannot then be used to prepare items that are to be gluten-free. 


Veggies ready for today's salad

I love seeing how a menu comes together depending on what donations we’ve received that week or just that morning. Every meal comes with a freshly made salad, usually made by me on the days I volunteer. Preparing these salads has introduced me to new ways of using vegetables. My usual salad dressing at home is a balsamic vinaigrette, but at the cafe I’ve watched our manager prepare fresh dressings from scratch, such as a recent cherry-berry vinaigrette.


Some days I get to prepare large pans of fresh fruit crisps. This day's started with the blueberries pictured and included fresh apples. While we have the small oven as seen in this photo (far back), for soups and rice we use several pressure cookers like the one next to the oven and in the foreground.


 Eleven-thirty comes and we are ready to serve meals out to those standing in our cafe line. Every meal comes with a hot food item, freshly prepared salad, soup, and a dessert.

I'm grateful for the food we can provide to our hungry neighbors and enjoy working along side other highly dedicated volunteers. My latest book, Generous Hearts, is informed greatly by my experience here and all proceeds will go to the food bank.


Prepping and Plotting


The busy holiday season is upon us again! I’ve had so much fun this month preparing Halloween, Thanksgiving, and general fall-themed cards. 

I have stacks of all these typessome needing envelopes and some still waiting to see what kind of card they will be.


While watching card tutorials from Gina K on YouTube, I discovered foiling products I’d never used. That changed quickly! I love foiling and these new materials make it so easy—easy to use up a lot more foil, but they make beautiful cards with plenty of shine.

Gina's products enable me to use both the original foiled design as well as the leftover foil. Another product came out recently that makes it easy to foil without heat and the results were very satisfying.

Leftover foil
Original foil


But that’s not all the preparations I have going. There are already many, many Christmas cards to donate to the food bank clients, and I’m eager to put more new supplies and designs into use.
 

More stacks of cards--all Christmas

Amidst all this card making fun, I'm also busy plotting for NaNoWriMo. This year’s sweet romance story involves heroine and hero working to keep residents at a senior living facility jolly and safe throughout December. Their two goals don’t go hand-in-hand, so my characters will need a little compromise to find their happily ever after.

What I haven’t planned is the title for my NaNoWriMo story. While the days are growing shorter, I'm hoping for a flash of inspiration for a title idea or two.


Eeek!


Yes, Halloween is approaching, but that’s not what frightened me this month. No, it was the apples that needed to be sliced for freezing, or

turned into applesauce and apple butter. Then it was the cucumbers to be pickled, followed by tomatoes to be sauced. Garden cleanup for final fruiting began and next month I will be transplanting these raspberries as well as planting a few new blueberry bushes. 


Halloween cards are under way and I’ve used a few different techniques this year. One new technique involved quite a learning
curse, er rather, curve. 😉 There were many stencils that I wanted to buy for making cards but instead, I went to my Cricut to cut stencils with happy results! This simple pumpkin face and the photo at top are done with stencils I made on the Cricut.


Bowl Cozy
Soon Thanksgiving and autumn cards will be started, and of course, Christmas gift planning is already underway. Learning curves continued when I took another sewing class to make bowl cozies. They turned out great and gave me ideas for Christmas gift bags!


And what else happens in November? Why, it’s NaNoWriMo—National Novel Writing Month. I’m plotting another Christmas story to write in November. It’s 50,000 words in November for the “win”! 


With all that fall planning underway I'll be sure to stock chocolate for the trick-or-treaters! (And a piece or two for myself 😊.)


Unraveling


Aprons in progress

Sew, I wanted to make part of a medieval peasant’s dress for a local renaissance faire this year. But, since I haven’t sewn in decades, I took a refresher sewing class. Not only did we sew this plushie cat, but we were also introduced to the embroidery machine—very intimidating, but also so enticing. 


More plushies!
Class went great and I made more plushies from dozens of adorable free patterns that are available at cholyknight.com.  Well, more
plushies meant more embroidering ideas. So, with my husband’s knowledge and effort, we now have an embroidery pattern that we will put on aprons for the food bank where I volunteer. 


Litster's shop at Camlann Village

My first apron was made from unbleached muslin. So blah. But combined with my interest in medieval history, I wondered how I might color it with plant dyes. I signed up for an online natural dyeing class. Soon after, I had the great fortune of talking with a dyer, or litster, at a nearby medieval village, Camlann. She gave me great advice on using rhubarb leaves for a pink color, and there are plenty of rhubarb leaves in my garden.


Etsy shop
This next part is no less tangled. All these textile projects merged with my interest in medieval history and led to curiosity about weaving. My new loom recently arrived and I’m looking forward to creating, um, something. Certainly not enough fabric for an apron! :)


Image from Liverpool Museums
 

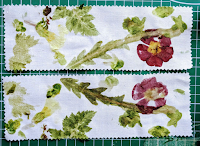
There's one more thread to untangle. Most recently, I've discovered Tataki Zome, a method of pounding flowers into material. I have a lot of unbleached muslin and look forward to practicing this craft.

What a tangled adventure. For now, I’m dyeing to see how a rhubarb leaf mordant and color turn out on that plain muslin apron! (The stalks were combined with blueberries for a tasty crisp.)


A Gilded Mess


Large gilding flake, off-brand flakes, and washi tape


Those who detest glitter probably want to read no further. It gets messier. Messier than glitter? Oh yes. Myself, I love glittery and metallic papers for card making. Sparkle just makes a card better! But I’ve met my match with some off-brand gilding flakes.

The major brands of gilding flakes come in large pieces (see above) that are easier to manage. But I loved the colors in this thirty pack set. 


After an initial attempt at using them I immediately discovered this was an outdoor endeavor. Why? Gilding flakes are incredibly volatile, in the sense of flying. As soon as you open the jar, flakes take flight. This is neither an activity for anyone with hay fever nor undertaken on a breezy day.
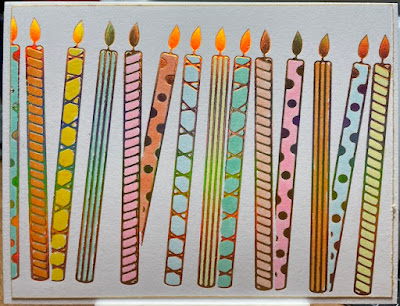
Gilding flakes can be used in several ways, though my favorite is with sticky-back paper. Other methods are with glues applied to an entire card base (4.25 x 5.5), or with stamps to gild an image. They also cling to anything in sight--skin, clothing, everything in the crafting room, and kitty.

I do love the effects of beautiful metallic pieces for entire card backgrounds or used to die cut shapes as accent pieces on cards. I tried several backgrounds and decided the multicolored panels don’t show up that well when embossed.

Gilding flakes and glitter work great in resin coasters without making a mess! 

I’ll be sticking with hot foiling, metallic papers, and metallic washi tape for a while now. My gilded age is taking a break while I attempt to clean up the craft room, sweep the patio, and brush kitty.


Roadtripping for Research


North Cascades Highway

Last month we took a road trip around the north Cascades highway. The trip allowed me a great opportunity to do historical research for my next book by way of small town museums. The first stop was Sedro-Woolley, a town far north of Seattle, established in late 1898. What an education this was!

According to the museum in Sedro-Woolley, outdoor privies were often relocated and then used as trash dumps. A lot can be learned about history from digging up these pits. Pottery, utensils, old bottles of many varieties, pistols, shoes, buckets, decorative household pieces, and tools were disposed in privies. Why my interest? I was going to have my protagonist avoid an old outhouse while searching property that had belonged to her family for over 100 years, but now this might be a way for her to dig up history. At the very least it deserves a mention in the story. Hmmm….

https://www.omventure.com/blog/mazama-store-in-mazama-washington
The next little community was Mazama founded around 1900. I fell in love with this little “town” tucked into the north Cascade mountains. While the community consists of just a handful of buildings, it's rustic and provided an experience of what a small pioneer town would look like. I’d love to live here if the gardening season weren’t so short. 😀
 
Another excellent example of old northwestern towns is Winthrop,
https://www.travelyesplease.com/travel-blog-winthrop-washington/

WA. The sidewalks are still boardwalk and all of the stores feature old western fronts. Due to the timing of our visit, I had to satisfy my museum interest with an online visit to the Shafer Historical Museum. It’s a town I hope we can visit again when everything is open.

I brought home two books about the history of life in small towns in the early 1900s. This information will aid my research of the historical period in my dual timeline story. While we can read about history, dig it up, and view artifacts, sometimes all this information raises more questions than answers about the past.


Birthdays


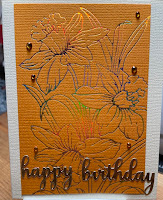
Foiled and hand-colored card


I continue to bring in cards to the food bank where I volunteer weekly. Since we are past Mother’s Day, I’ve focused on birthday cards. Every day someone is having a birthday!

Watching a card maker who has fantastic videos, Natasha Foote, I’ve learned new techniques to use with my cards. Natasha encourages everyone to use what they have when recreating cards they see online—you don’t have to buy the latest dies, inks, or patterned paper. I appreciate this approach as I have neither unlimited funds nor space to store regular purchases of card making accessories.

So, focusing on using what I have, including those pieces that don’t turn out as hoped, these cards are going into the food bank this month.

Embossing folder and paper

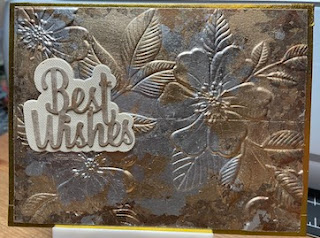
Two cards were made using my foiling machine and an embossing folder.


Unfortunately, embossing with foil didn’t work well. By trimming the bad pieces, I was able to make two very nice cards.


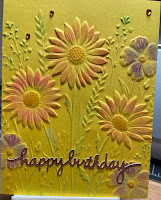
Employing the same embossing folder in its intended use--without foiling--and adding some inks, this card came out very nice.


Using both pieces of a card front with a balloon cut, I was able to make two cards that I really like. One card uses the empty space, and the other uses the piece that was cut out.


Another way I use what I have, is to recycle pages from my daily calendar into cards. Using dies to cut a nice edge and adding some embellishments, I love the way these cards turn out. I figure anyone can use a pick-me-up card now and then. 


Sometimes Life Does Imitate Art


The book I’m currently working on features a protagonist who is an assistant manager at a food bank. The idea came to me because I love volunteering at a food bank near me. Recently, while setting up for the morning shift, I noticed several Easter cards on a table with miscellaneous non-food items.

If you’ve read this blog even occasionally, you probably know I’m a card maker. I love incorporating new techniques and patterned papers, but
have far too many cards to use myself. In my book, the main character is also a card maker (write what you know, eh?). I asked one of the managers at the food bank if I could bring in cards that I make and he gave the okay.

Joy! Something to do with the cards I love making, and our clients have been enjoying them as well. I brought in several Easter cards last month and since it’s a little too early for the Mother’s Day cards I’ve stockpiled, I focused on birthday cards this month. 


I pulled out the hot foil plates and press and spent 45 minutes preparing card bases that were then ready for embellishments. The week after Easter, I started taking in the birthday cards and saw one woman take home three! 


While there are organizations that take extra cards, like my protagonist, I enjoy seeing my cards go home with people who are excited when they see them.


I'm blessed to be able to craft cards and have a full plate. I'd love it if readers would consider regular donations to their local food banks. All proceeds from my upcoming book will be going to the food bank where I volunteer.

https://www.udistrictfoodbank.org/donate/


Easter 2024


Easter seemed to be early this year, so I checked the earliest and latest dates it can fall, which can be anywhere from March 22 to April 25. So, not the earliest this year, but I still had to get hopping on card making!

Pinterest is always a great source for card ideas, and Easter is no exception. I also found a tutorial for an Easter hat card on a blog by a card maker I follow. Along with patterned papers, ink, glue, die cuts, and the Cricut, several different cards are now ready for mailing.

I love the simplicity of the card at the top of the page and the cute little bunny standing in for the letter “A”. The Cricut made this one easy.

What’s Easter without a chocolate bunny? I used the bunny cut out from another card to make this one. The patterned paper featuring chocolate bunnies made a perfect background.


This card uses the reverse of the chocolate bunny card above and features an embossed design over patterned paper. The cut image allowed me to use another sheet of patterned paper.


Here’s a cute little bunny peeking in to wish us a happy Easter. This one used very basic shapes and it was fun to powder the bunny's cheeks and draw on whiskers.


This card allowed me to use the most patterned paper of all the cards. It’s simple, and I love how it turned out.


What’s Easter without an Easter bonnet? Yes, this is a card based on a card maker’s blog this month. The bottom of the hat opens up to allow for a written message.


But the best Easter basket of all? This little cutie! :) 


Apple a Day Cafe

  Original art work by UDFB staff Apple a Day cafe is the free meal program provided by the University District Food Bank in Seattle near t...